How to Create a RAG Custom Database (Voice AI, Chat AI, and Web Orbs)
RAG Custom Database (Voice AI, Chat AI, and Web Orbs)
Goal:
Enable document upload and querying through Supabase to support complex dataset parsing and knowledge base access via custom tools in Voice AI and chat interfaces. This system unlocks voice-accessible knowledge bases and enhanced querying for chat-based assistants.
Resources:
-
Buildship Remix Link: https://app.buildship.com/remix/f1643e2b-bd80-48b0-b556-49dea270b2f9
-
AI Assistant Upload Portal: https://createassistants.com/supabase-knowledge
Prerequisites
-
OpenAI Account:
-
API Key
-
-
Supabase Account:
-
API Key (Project Settings > API)
-
Project URL (Project Settings > API)
-
-
Buildship Account:
-
Access to the Remix project (linked above)
-
-
AI Assistant Account:
-
Active assistant and custom tool setup
-
Steps:
-
Open the Remix Link in your Buildship account.
-
Duplicate the project from the link provided.
-
Add your API keys:
-
OpenAI API Key
-
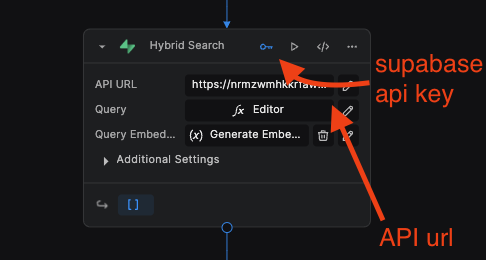
Supabase API Key
-
Supabase Project URL (Found in Supabase → Project Settings > API, right at the top)
-
-
Update all Supabase nodes with this info:
-
There are 6 nodes total:
-
5 nodes in the “Add Document Chunks” workflow
-
1 node in the “RAG using Supabase” workflow
-
-
Make sure all of them have the correct keys and URL added.
-
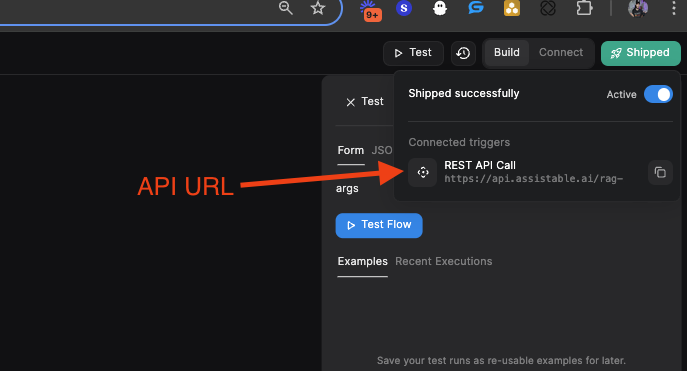
After you've updated the Supabase nodes (with the project URL and API key) and the OpenAI nodes (with your OpenAI API key), click "Ship" in the top right corner to save the changes. This will generate the API URLs that we'll need later.
-
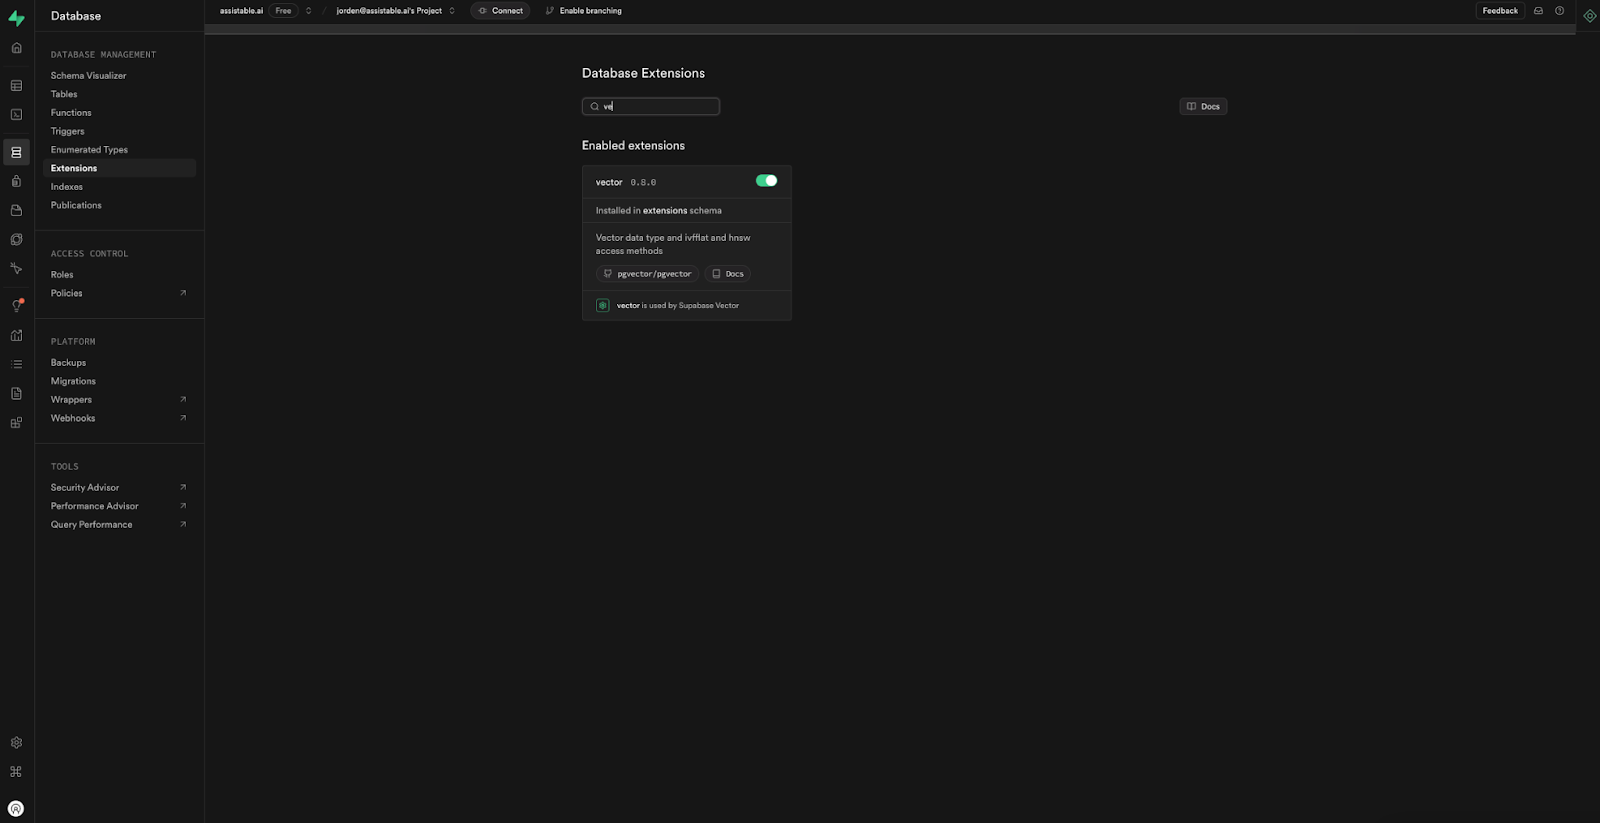
In Supabase, click on the Database tab - we need to add the extension “vector” to add the knowledge embedding to.
-
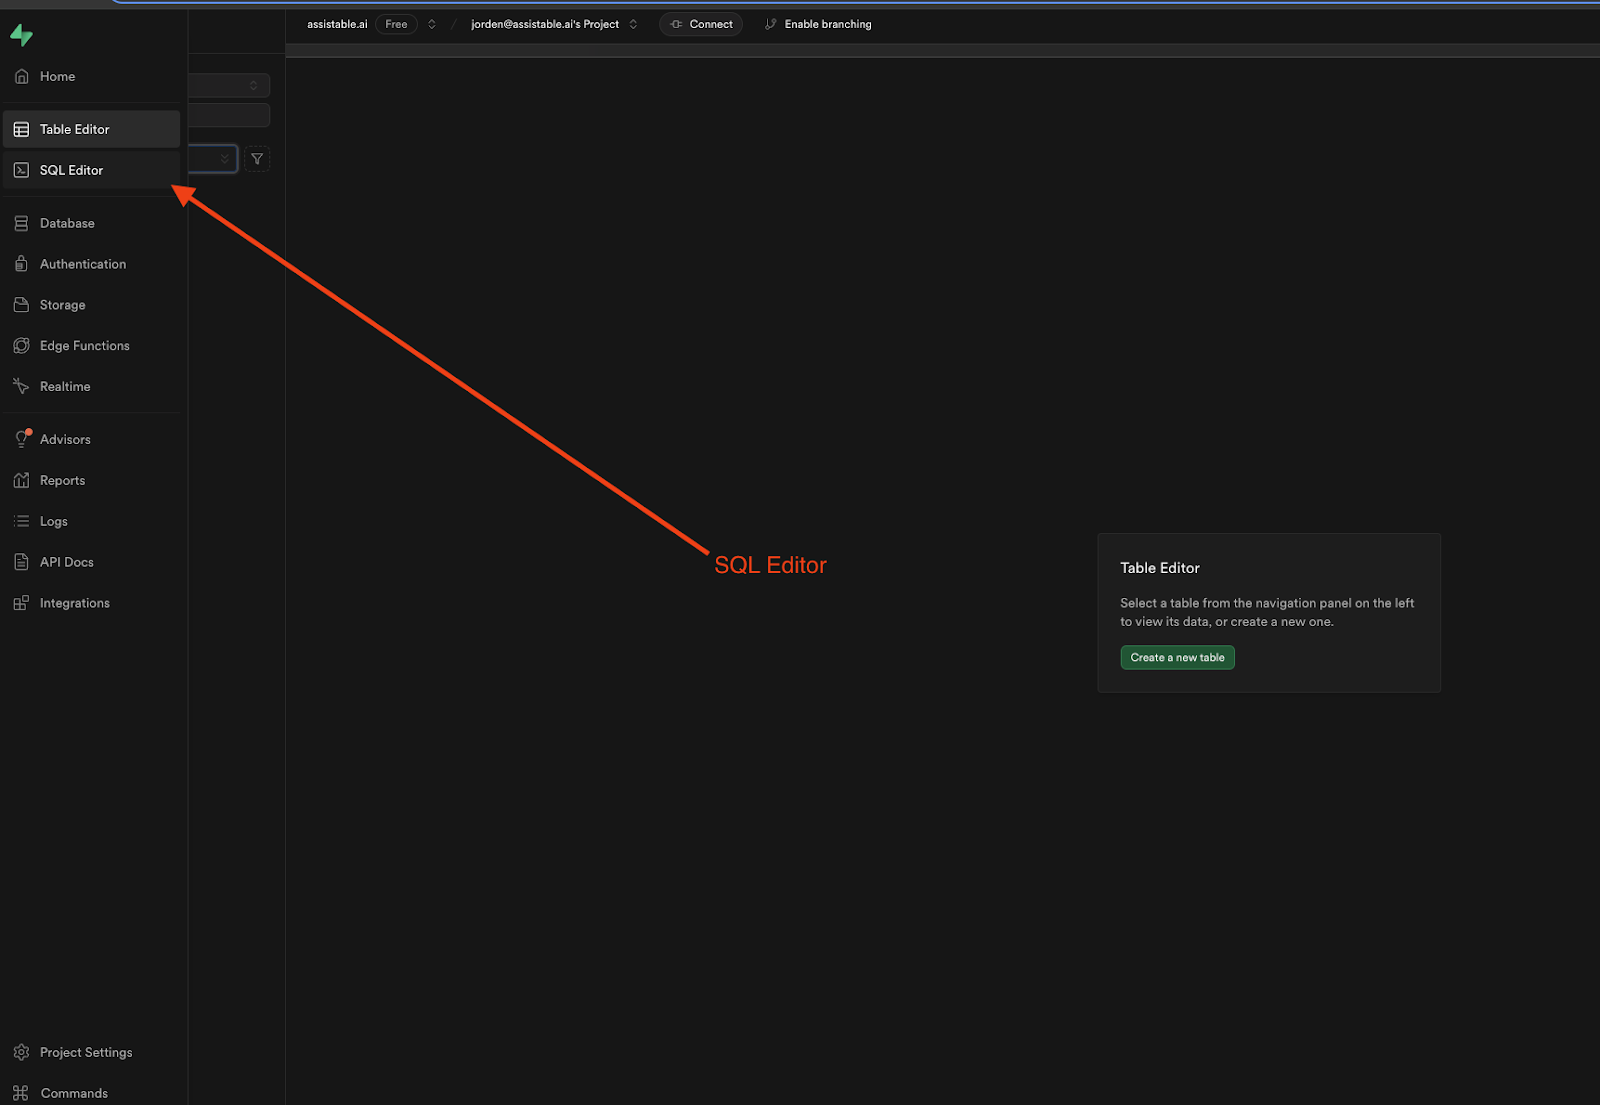
Once you have that enabled, go to the “SQL Editor” tab. We are going to run some code.
-
The following code will create both databases that we need and allow for querying of that database using RAG (embedding the question to get the similar search results aka answers).
-
In the SQL editor, run each of the following Copy Code which should result in Success no rows returned <- proper output. After that output, backspace it and add the next one in to run each code individually.
-
-
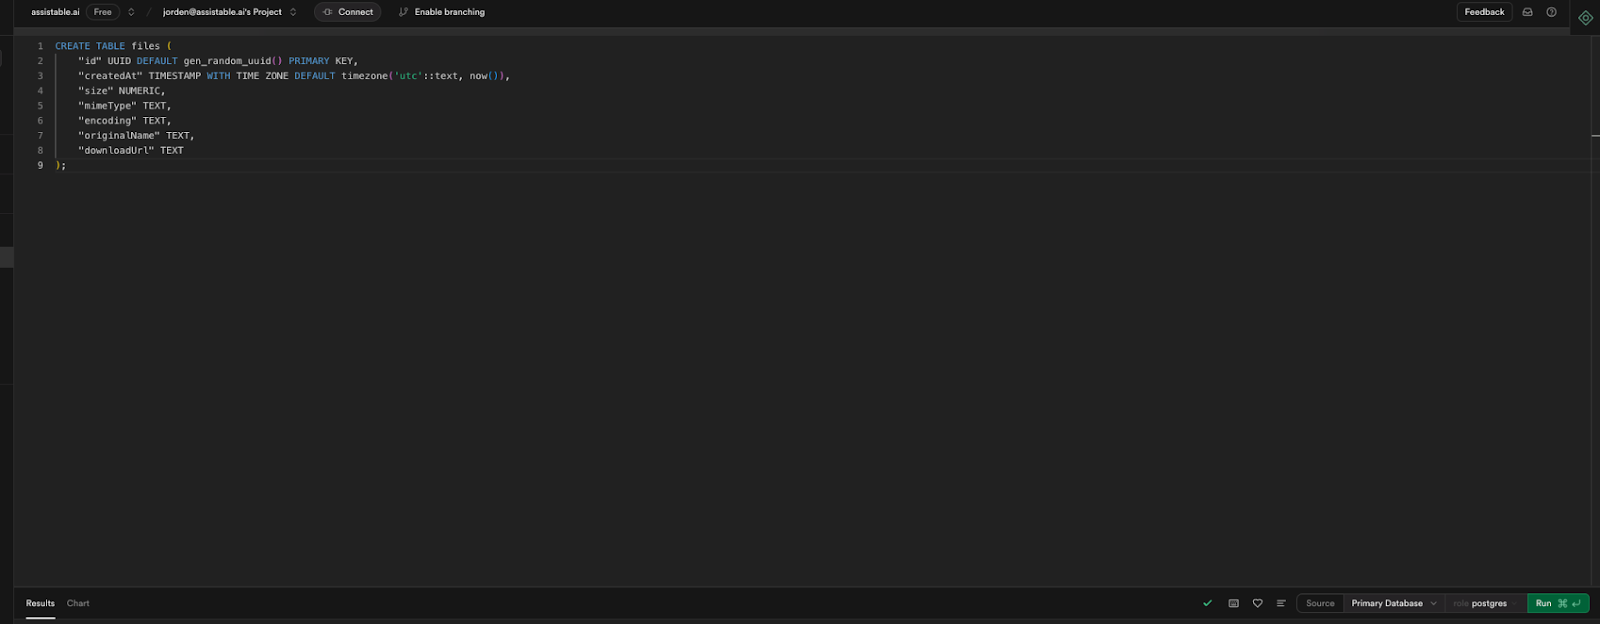
Copy Code (creates custom database table):
CREATE TABLE files (
"id" UUID DEFAULT gen_random_uuid() PRIMARY KEY,
"createdAt" TIMESTAMP WITH TIME ZONE DEFAULT timezone('utc'::text, now()),
"size" NUMERIC,
"mimeType" TEXT,
"encoding" TEXT,
"originalName" TEXT,
"downloadUrl" TEXT
);
-
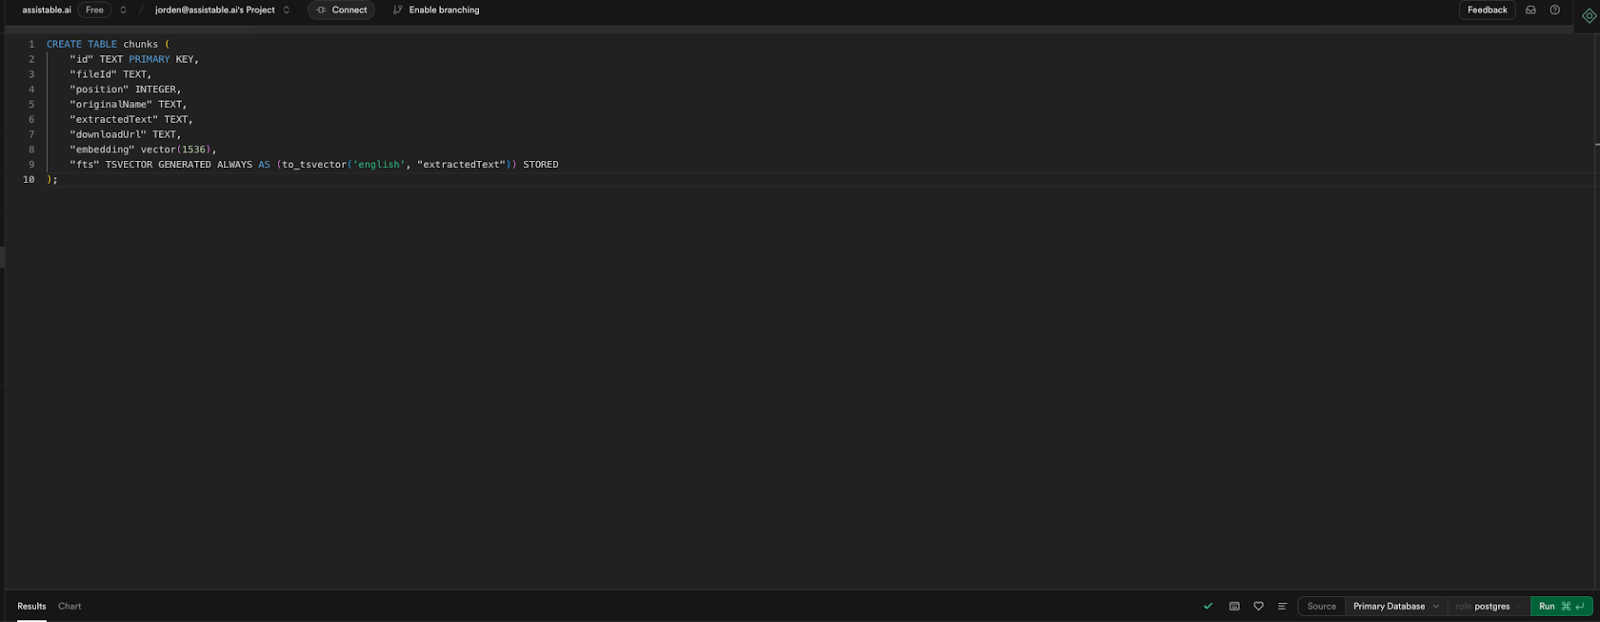
Copy Code (creates custom database table):
CREATE TABLE chunks (
"id" TEXT PRIMARY KEY,
"fileId" TEXT,
"position" INTEGER,
"originalName" TEXT,
"extractedText" TEXT,
"downloadUrl" TEXT,
"embedding" vector(1536),
"fts" TSVECTOR GENERATED ALWAYS AS (to_tsvector('english', "extractedText")) STORED
);
-
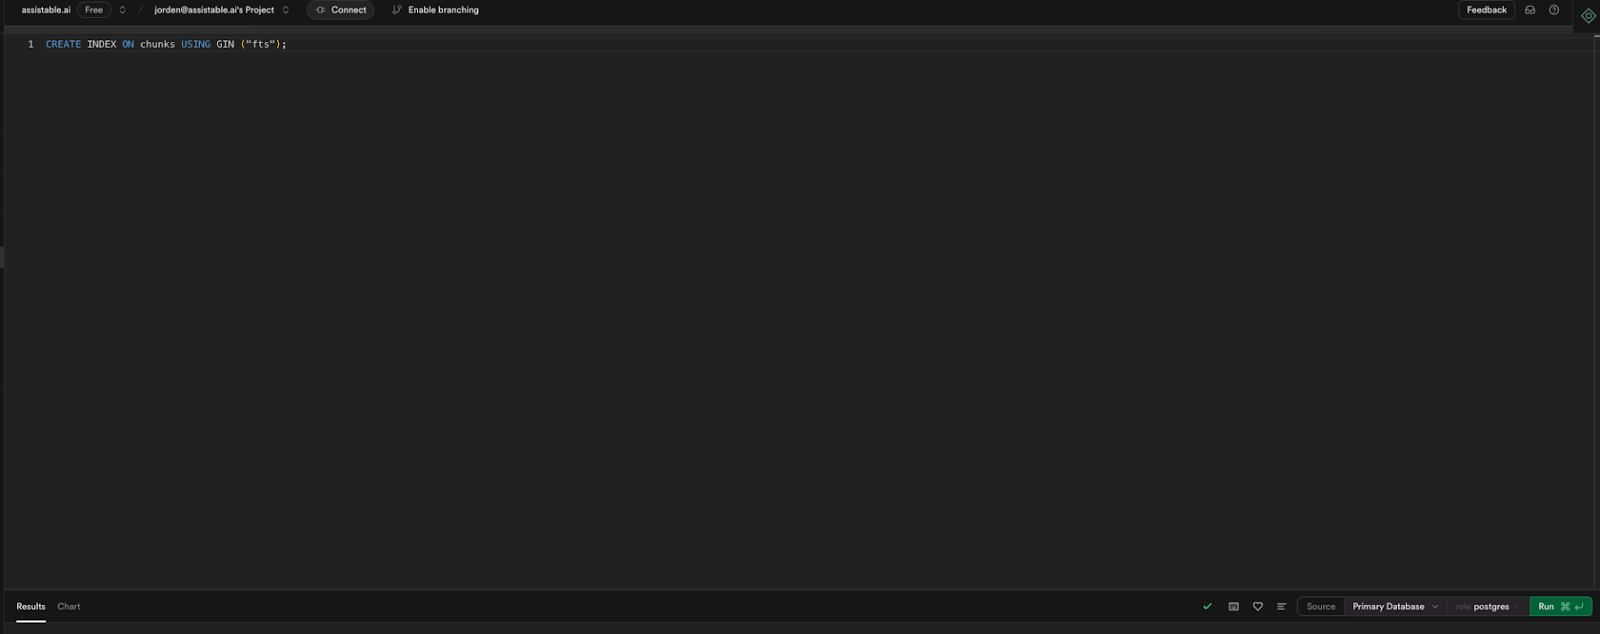
Copy Code (allows indexing on fts):
CREATE INDEX ON chunks USING GIN ("fts");
-
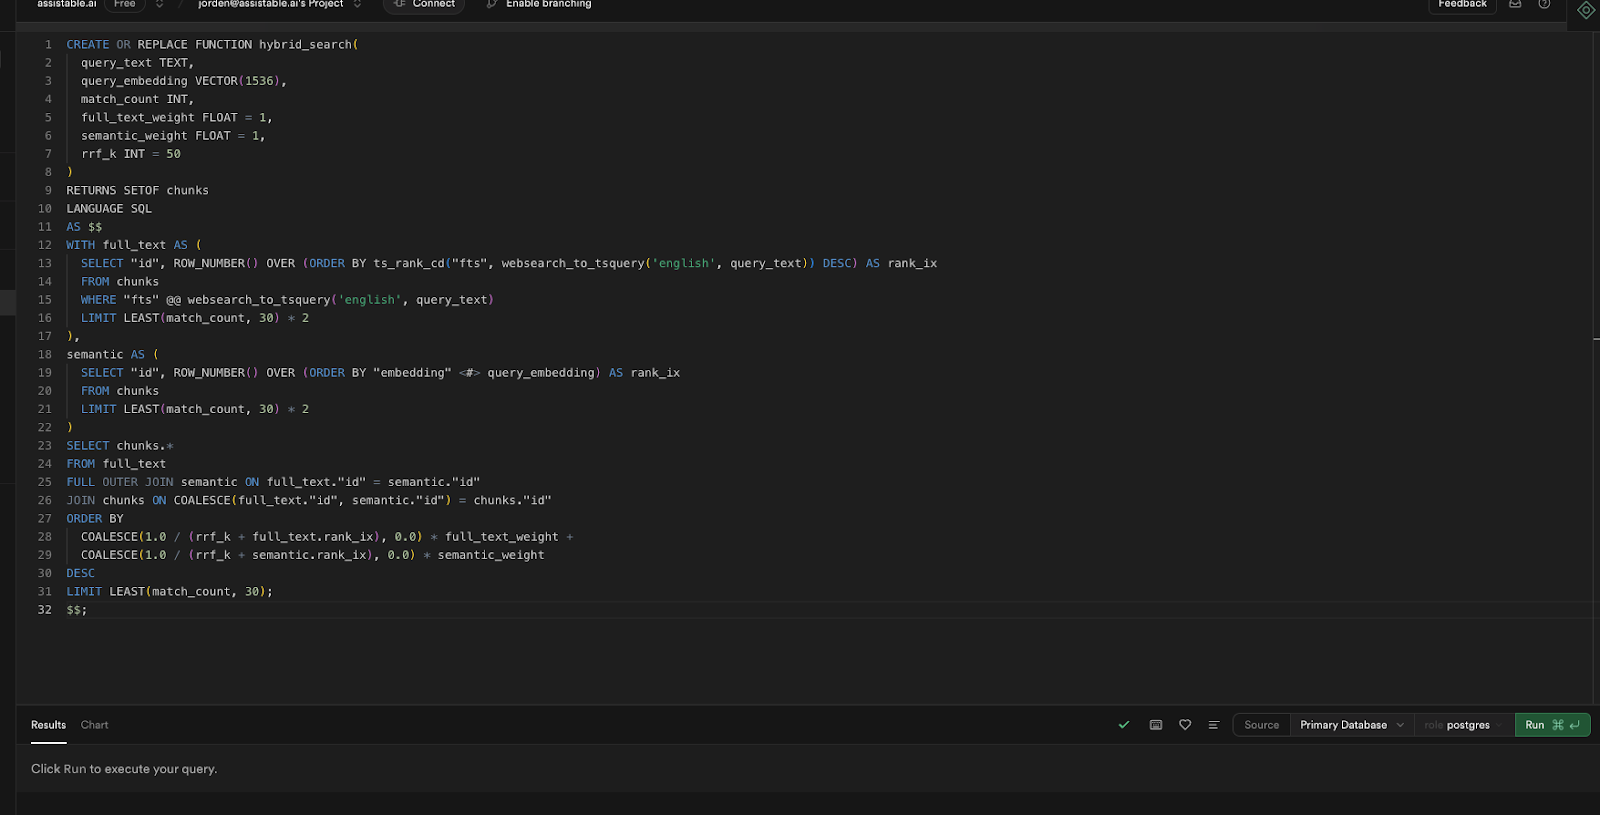
Copy Code (allows for hybrid-searching using vectors and text):
CREATE OR REPLACE FUNCTION hybrid_search(
query_text TEXT,
query_embedding VECTOR(1536),
match_count INT,
full_text_weight FLOAT = 1,
semantic_weight FLOAT = 1,
rrf_k INT = 50
)
RETURNS SETOF chunks
LANGUAGE SQL
AS $$
WITH full_text AS (
SELECT "id", ROW_NUMBER() OVER (ORDER BY ts_rank_cd("fts", websearch_to_tsquery('english', query_text)) DESC) AS rank_ix
FROM chunks
WHERE "fts" @@ websearch_to_tsquery('english', query_text)
LIMIT LEAST(match_count, 30) * 2
),
semantic AS (
SELECT "id", ROW_NUMBER() OVER (ORDER BY "embedding" <#> query_embedding) AS rank_ix
FROM chunks
LIMIT LEAST(match_count, 30) * 2
)
SELECT chunks.*
FROM full_text
FULL OUTER JOIN semantic ON full_text."id" = semantic."id"
JOIN chunks ON COALESCE(full_text."id", semantic."id") = chunks."id"
ORDER BY
COALESCE(1.0 / (rrf_k + full_text.rank_ix), 0.0) * full_text_weight +
COALESCE(1.0 / (rrf_k + semantic.rank_ix), 0.0) * semantic_weight
DESC
LIMIT LEAST(match_count, 30);
$$;
Success no rows returned <- proper output
-
Add your PDF Upload workflow API URL into the Buildship API PDF Upload URL field under the “Upload” tab.
Upload your data in PDF format:
-
If your file is in another format, convert it to PDF (You can do this in Google Docs or MS Word by going to File > Download > PDF or use any online converter).
-
This will schedule the upload, and you can check the status in the Buildship workflow logs.
-
After uploading your documents, go to your Supabase database and open the "Table Editor" tab.
-
Click on the "chunks" database.
-
Refresh the page, and you should see the uploaded data appearing there.
-
Add a custom tool to your assistant and configure it as follows. Add it to your assistant and test your knowledge base either in voice, chat, orb.